
Using WiFi to connect to the Internet
In Chapter 6 we saw that being able to hook up our experiments to the Internet has the potential to greatly enhance our data science toolkit. In Chapter 7 and Chapter 8 we looked to see if the functionality on board the micro:bit could connect us to the cloud, to give us access to the services available there. Although both BLE and the micro:bit radio provide some really useful wireless functionality, we are still no closer to connecting properly to the IoT than we were several chapters ago. It is time to look beyond the native functionality of the micro:bit.
Connecting to the IoT is relatively simple these days, and most commonly done using Wi-Fi. In this chapter we will add Wi-Fi to our micro:bit weather station and connect it to the cloud.
Section 9.8 – Connecting to the IBM cloud:
First and foremost – check / update the firmware on your BBC micro:bit. Its quick and easy, and best described by the lovely people at the Micro:bit Foundation in this article: how to check and update firmware on a micro:bit.
This is necessary to ensure the micro:bit can connect to an IoT platform. There are a number of other reasons to update the firmware – other software and hardware that requires updated firmware to work properly. It is always good practise to ensure you are running the most recent version of the firmware.
In Chapter 9 we write some code to share data with the IoT platform (IBM).
The full code listing is shown below (remember to change your details accordingly):
Updating Firmware on the CW01
- IF you got your CW01 as part of the XK05 kit then you are fine – it comes pre-flashed with the right firmware.
- BUT – if you bought it loose or it came in another, non-micro:bit kit, then you will need to update it.
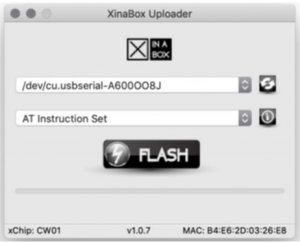
- Download the XinaBox Uploader application. This is used to flash a range of pre-compiled code bases onto the CW01.
- Start Uploader.
- Connect you CW01 to your IP01/02 and plug it into a USB port on your computer.
- Uploader should auto-detect the CW01… if not try removing the CW01 and plugging it in again. Perservere.
- From the list of software options select AT Instruction Set.
- Click Flash. Wait a bit. Sometimes the app will ‘hang’ on the provisioning stage – at this point the correct firmware HAS flashed onto your CW01, so you can remove it and continue with the chapter.
To check if you have correctly flashed the CW01: Connect the CW01 + IP01/02 to your computer then open up a terminal app (I use Arduino IDE). Send the String “AT” to the CW01 and it should respond with “OK”.